Change the User-Agent in Selenium | Steps & Best Practices

Lucas Mitchell
Automation Engineer

Changing the User Agent in Selenium is a crucial step for many web scraping tasks. It helps to disguise the automation script as a regular browser, thereby avoiding detection by websites. This guide will walk you through the steps to change the Google Chrome User Agent in Selenium and provide best practices to ensure your web scraping tasks run smoothly.
Table of content
- Understanding Selenium User-Agent
- Default User-Agent in Selenium
- Why Change the User-Agent?
a. Changing User-Agent in Google Chrome Selenium
b. Changing User-Agent in Firefox Selenium- Best Practices for Smoother Website Access
- Conclusion
Understanding the Selenium User-Agent
The User-Agent string is a crucial part of HTTP headers that plays an important role in the communication between browsers and web servers. It provides specific information about the browser, operating system, and device being used to send the request. Here’s an example of a typical User-Agent string:
Mozilla/5.0 (Windows NT 10.0; Win64; x64) AppleWebKit/537.36 (KHTML, like Gecko) Chrome/92.0.4515.159 Safari/537.36
This string indicates that the request originates from a Chrome browser running on a Windows operating system.
However, when using Selenium for web automation, the default User-Agent string can reveal that the requests are being made by an automated script. Websites equipped with anti-bot measures can easily detect this and block access to prevent automated scraping or testing. This makes it essential to customize the User-Agent string in Selenium to make the requests appear as if they are coming from a genuine browser, thereby reducing the risk of detection and blocking.
To achieve this, you can modify the User-Agent string in Selenium to match those of standard browsers, enhancing the stealth and effectiveness of your automated scripts.
Default User-Agent in Selenium
Yes, Selenium does use a User-Agent string to identify itself when making HTTP requests. By default, Selenium will use the User-Agent string associated with the browser it is automating. This means that when you run a Selenium script with Chrome WebDriver, the User-Agent string will reflect the default User-Agent for Chrome.
However, this default User-Agent can sometimes signal to web servers that the requests are coming from an automated script, making your Selenium-based operations prone to detection and blocking by anti-bot systems. Customizing the User-Agent string can help mitigate this issue, allowing your scripts to blend in more seamlessly with regular browser traffic.
Redeem Your CapSolver Bonus Code
Boost your automation budget instantly!
Use bonus code CAPN when topping up your CapSolver account to get an extra 5% bonus on every recharge — with no limits.
Redeem it now in your CapSolver Dashboard
.
Why Change the User-Agent?
As previously mentioned, the User-Agent field contains information about the browser type, version, engine, and operating system making the request. If a target website receives multiple requests from the same User-Agent in a short period, it has reason to suspect that the requests are coming from the same user or a single bot. The site administrators can then temporarily block requests from that specific User-Agent to prevent further access. Particularly in scenarios where a large amount of data needs to be scraped, being able to change the User-Agent to impersonate different users is crucial. This can significantly increase the success rate of your scraping efforts.
Change the User-Agent in Google Chrome Selenium
If you haven't installed the selenium library locally, you can use the following command to install it:
pip install seleniumImport the library:
python
from selenium import webdriverThen initialize a Chrome Options object and set a custom User-Agent:
python
custom_user_agent = "Mozilla/5.0 (Windows NT 10.0; Win64; x64) AppleWebKit/537.36 (KHTML, like Gecko) Chrome/122.0.0.0 Safari/537.36"

chrome_options = webdriver.ChromeOptions()
chrome_options.add_argument(f'--user-agent={custom_user_agent}')
Next, create a new instance of ChromeDriver and make a request to the target website:
python
driver = webdriver.Chrome(options=chrome_options)
driver.get("https://httpbin.org/user-agent")
HTTPBin is a web request debugging service that displays the User-Agent of the request. If the code is correct, you should see our custom User-Agent displayed as shown in the image below:
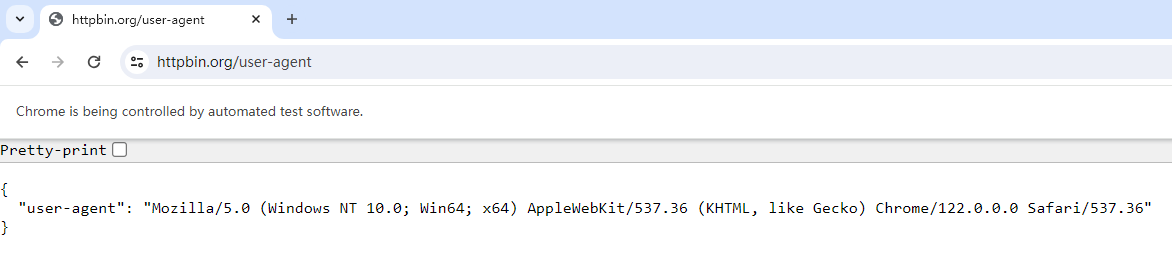
In the above code, the custom_user_agent value is static. If you want to use a different User-Agent each time you open the browser, you can manually collect various User-Agent strings and compile them into a list. Then, randomly select a value from the list each time. Alternatively, you can use the fake-useragent library, which provides a simple way to generate random User-Agent strings on the fly. Install the library with the following command:
pip install fake-useragentUsing fake-useragent is straightforward:
python
from fake_useragent import UserAgent
ua = UserAgent()

# Get a random browser user-agent string
print(ua.random)

# Or get user-agent string from a specific browser
print(ua.chrome)
# Mozilla/5.0 (Windows NT 10.0; Win64; x64) AppleWebKit/537.36 (KHTML, like Gecko) Chrome/114.0.0.0 Safari/537.36
print(ua.firefox)
# Mozilla/5.0 (X11; Linux x86_64; rv:109.0) Gecko/20100101 Firefox/115.0
print(ua.safari)
# Mozilla/5.0 (Macintosh; Intel Mac OS X 10_15_7) AppleWebKit/605.1.15 (KHTML, like Gecko) Version/16.2 Safari/605.1.15
When combined with Selenium, the complete code looks like this:
python
import time
from selenium import webdriver
from fake_useragent import UserAgent

ua = UserAgent()
chrome_options = webdriver.ChromeOptions()
chrome_options.add_argument(f'--user-agent={ua.random}')

driver = webdriver.Chrome(options=chrome_options)
driver.get("https://httpbin.org/user-agent")

time.sleep(10)
driver.quit()
This setup allows us to randomize the User-Agent used with Selenium-driven Google Chrome.
Changing the User-Agent in Firefox Selenium
Selenium can drive not only Google Chrome but also Firefox. The only difference is to switch webdriver.ChromeOptions() to webdriver.FirefoxOptions(). Here's the complete code:
python
import time
from selenium import webdriver
from fake_useragent import UserAgent
ua = UserAgent()
firefox_options = webdriver.FirefoxOptions()
firefox_options.add_argument(f'--user-agent={ua.random}')
driver = webdriver.Firefox(options=firefox_options)
driver.get("https://httpbin.org/user-agent")
time.sleep(10)
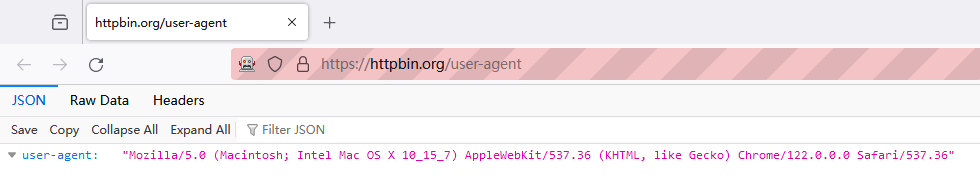
driver.quit()You can see that the User-Agent has been successfully changed on the webpage:
Best Practices for Smoother Website Access
The purpose of changing the User-Agent is to prevent the target website from blocking our access. Blocking based on User-Agent is just one of many anti-scraping and anti-bot measures. More commonly, websites impose challenges like CAPTCHA(such as recaptcha etc.) to filter out bots. These challenges are often complex and significantly hinder website access.
Using Capsolver services can help you solve CAPTCHA challenges. If you're making API requests to a target website and encounter CAPTCHA challenges, you can use Capsolver's task API, which solves various challenges and returns the correct token to you.
If you're using automation tools like Selenium, you can integrate Capsolver's extension seamlessly into browsers like Chrome and Firefox. This integration enhances your capabilities and provides a smoother website access experience.
Conclusion
With this article you can get a good grasp of User-Agent customisation in Selenium. This allows you to not only improve the stealth and reliability of your web scraping efforts, but also ensure smoother interactions with different websites. Whether it's through CAPTCHA challenges or simulating user behaviour, strategically tweaking user-agents can be a game changer. And remember, with tools like CapSolver, overcoming barriers to web data access is not only feasible, it's efficient. In today's dynamic digital environment, adopting these practices can often increase the efficiency of your automation projects and maximise the benefits of web scraping!
FAQ
1. Why should I change the User-Agent when using Selenium?
Changing the User-Agent helps your Selenium script appear like a real human browser instead of an automated tool. Many websites detect automation by checking default User-Agents and may show errors, throttle requests, or trigger CAPTCHAs. A customized User-Agent improves stealth and reduces blocking.
2. Can I rotate User-Agents automatically in Selenium?
Yes. You can create a list of different User-Agents and pick one randomly for each session, or use libraries like fake-useragent to generate random browser identities automatically. Rotating User-Agents is especially useful during large-scale scraping tasks.
3. Does changing User-Agent alone prevent blocking?
Not completely. User-Agent modification is only one part of avoiding bot detection. Websites also track cookies, IP reputation, request speed, behavior, and may display CAPTCHA challenges. Pairing Selenium with CAPTCHA-solving services like CapSolver can help maintain smooth access.
4. How do I check if my User-Agent change worked in Selenium?
You can visit debug sites such as https://httpbin.org/user-agent after launching the driver. The page will display the current User-Agent being used by your Selenium browser—if your custom value appears, the configuration is successful.
5. Can I change the User-Agent in Firefox as well as Chrome?
Yes. For Chrome you use webdriver.ChromeOptions(), and for Firefox use webdriver.FirefoxOptions(). Add the User-Agent argument to the options object, then pass it when initializing the WebDriver.
6. What if websites still show CAPTCHA even after changing the User-Agent?
This is common—modern websites rely on more than just User-Agent detection. If CAPTCHAs appear frequently, you can integrate CapSolver via API or browser extension to solve them automatically, improving automation flow and avoiding interruptions.
More
The other captchaApr 14, 2026
Can AI Solve CAPTCHA? How Detection and Solve Really Work
Explore how AI detects and solves CAPTCHA challenges, from image recognition to behavioral analysis. Understand the technology behind AI CAPTCHA solvers and how CapSolver aids automated workflows. Learn about the evolving battle between AI and human verification.

The other captchaApr 09, 2026
CAPTCHA Solving API Performance Comparison: Speed, Accuracy & Cost (2026)
Compare top CAPTCHA solving APIs by speed, accuracy, uptime, and pricing. See how CapSolver, 2Captcha, CapMonster Cloud, and others stack up in our detailed performance comparison.